

How To Draw Face From 3/4 View
The anime way was created to make blithe characters both expressive and like shooting fish in a barrel to breathing. This means that many elements of the face have been extremely simplified—and this means they are easy to describe, too. However, if you lot want to depict anime characters from imagination, you must know certain rules.
In this tutorial, I volition show yous how to draw an anime caput in various views, step by step. I'll likewise show you how to draw manga eyes, nose, lips, and ears, explaining their "beefcake" and styles. You'll learn how to depict deformed faces likewise, and how to create a stardom between males and females. After this tutorial, yous'll be able to describe your own anime heads from scratch!
This is the second tutorial in our serial, How to Describe Anime. You may besides want to accept a look at the first one, to acquire how to draw anime bodies:
i. Anime Head Anatomy
Although manga drawings are flat, they illustrate something that is definitely 3D. Because of this, it's very useful to understand the 3D construction of an anime head instead of memorizing a few 2nd templates for diverse views. It also makes information technology easier to go on the proportions correct in every perspective.
The nearly distinctive function of the head is an elongated sphere that represents the cranium. It looks similar a circle in the forepart view and an oval in the side view.

The basic proportions of an anime head are very simple: the whole head should accept a middle line...


... which marks the point for attaching the lower role of the face.


This centre line also marks the area of the eyes. They can go correct through it or be placed under it, depending on the style you're going for.


The area under the line can exist cut in half too—this middle line marks the location of the nose.


The lower one-half can be divided into thirds. The mouth is usually placed on the starting time of these lines.


The ear is usually located betwixt the big heart line and the nose line.


The hairline is ordinarily located on the line marking the halfway betoken of the upper half of the face.


The neck should be sparse, fastened to the original sphere at the bottom.


In one case you have your proportions fix like that, yous can easily draw the details!


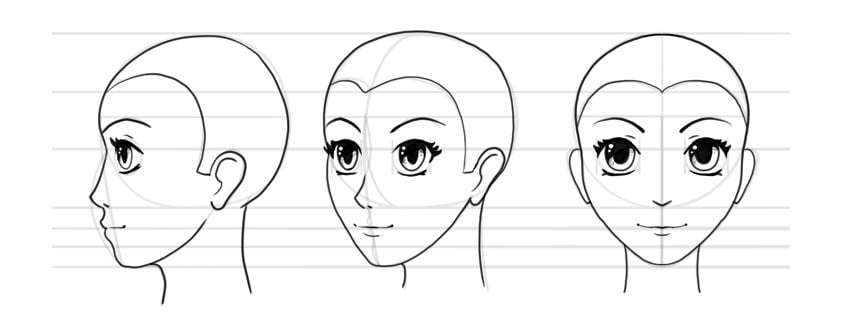
2. How to Describe an Anime Head in Profile, Front end, and 3/4 Views
But this was a very full general overview of how an anime head is constructed. Let's draw a manga head footstep by stride in all the popular views to ameliorate understand the process. Just keep in listen that manga is not one style, so the way I'm showing y'all is not the only correct ane. Experience free to experiment!
Footstep 1
As I mentioned before, the original sphere is non really a sphere—it's elongated, and information technology looks slightly unlike in diverse views. If you accept issues with information technology, y'all tin ever start with a sphere and add some space in the back if needed.


Footstep 2
Draw a line towards the bottom, defining the length of the face. Mark the middle of the head once you lot're done.


Step 3
Outline the lower part of the face. Notice how it changes depending on the view.


Step 4
Add together the eyes in your chosen surface area—on the eye line or under it. A classic proportion tells us to leave a ane-middle-wide space between the optics, but this rule is often cleaved for a stylized effect.


Step five
Draw the nose on the halfway line of the lower half. Create a subtle indentation between the eyes (or not—some styles don't demand information technology!).


Step 6
Divide the part nether the nose into thirds.


Footstep vii
Draw the mouth in this expanse.


Footstep 8
Draw the eyebrows over the eyes. Their location should depend on the expression you're going for.


Footstep ix
Depict the ears between the middle line and the nose line.


Step 10
Depict the hairline at the halfway point of the upper half.


Step xi
Add the neck. It should merge gently with the jawline.


Pace 12
With all the guide lines in place, yous tin safely finish your manga face up.


3. How to Depict Anime Eyes
Now you know how to depict proportions of a manga confront, just yous notwithstanding need to acquire about the details to draw it convincingly. Let's see how to depict eyes in manga style step by step.
Step 1
Anime eyes come in many shapes and sizes. First your cartoon with a general outline of the eye.


Pace 2
Draw the curve of the upper eyelid, forth with the eyelashes in the outer corner.


Step 3
Add some thickness to the eyelashes, if you need it.


Step 4
In manga way, the eyes usually don't really have an outline. Instead, it'south suggested by the shape of the eyelids. Turn the eyelashes in the outer corner down, accentuating the side of the eye.


Footstep 5
Depict the lower eyelashes. They're ordinarily much subtler. Observe how they accentuate the shape of the eye.


Step half dozen
Add the iris. It should exist big, circular, or vertically oval.


Pace seven
Add the educatee. It should mimic the shape of the iris and exist placed exactly in the middle.


Step 8
Cross the eye with a shadow. Its direction should be identical in both eyes (the symmetry is broken here).


Step nine
Depict the polish dots. They shouldn't be symmetrical either.


Stride 10
Darken the eyes: fill the eyelashes, the pupil, and the shadow, leaving the iris and smoothen dots untouched.


Step eleven
Add the eyebrow. There are many shapes to choose from!


Stride 12
To make an centre look bigger, add the crease of the eyelid over information technology.


Step xiii
Anime optics tin can be stylized in various means to make the character unique. It'south especially important in a archetype, black-and-white manga, where you can't distinguish the eyes with a color.


Step xiv
To draw the anime eyes airtight, just imagine the upper eyelid going down and rotating.


If you lot want to learn more about how to depict anime eyes, particularly how to rotate them, you lot tin learn a lot from this tutorial dissecting Disney fashion. After all, anime has borrowed a lot from Disney!
four. How to Draw Anime Lips
Optics are certainly the most adult feature in a manga face. The other features are heavily stylized and every bit simple every bit possible. Let me show y'all how to achieve this outcome.
Anatomy of Anime Lips
To simplify anything, showtime you demand to know the original form. Accept a await at this tutorial to learn how the existent lips are constructed and how to draw them.
Manga lips yet work like the realistic ones—they're simply reduced to as few lines as possible. Even the line between the lips may non be continuous to go along the effect very subtle. However, the invisible lower lip still casts a shadow, and in the side view both lips reveal their shape.


Styles of Anime Lips
But again, anime doesn't take ane style, and many variants are present. Y'all can experiment with many styles of the lips, equally long as you keep them consistent with the other elements of the face up.


5. How to Describe an Anime Nose
An anime olfactory organ is even more than simplified than the lips. Sometimes, it's simply not present at all! Let'due south take a look at how it's achieved.
Anatomy of an Anime Nose
In this tutorial, you tin can learn how a existent nose works and how to draw it:
If you lot place a archetype anime nose over a realistic one, you'll notice that it borrows just the crucial elements: the curve of the nose and its bottom part.


Styles of Anime Noses
This bones recipe can, of course, be modified across various styles.


vi. How to Depict Anime Ears
Rotation of Anime Ears
Anime ears are very simple to depict, with one exception: if you lot come across them from behind, their base becomes visible. It's like a conch, and you must imagine information technology this way—you tin't simply draw the ears the same way in every view, or they'll look apartment!
You tin acquire more nigh the structure of the ears and how to describe them here:


Styles of Anime Ears
Ears are complicated, and they tin can be simplified in many ways:


7. How to Draw Anime Faces in Diverse Styles
Manga Deformation
Manga borrows from reality, but sometimes it goes pretty far abroad from it. To create a style that will await expert and not monstrous, always proceed these basic proportions: half of the head as a line marking the eyes, the nose halfway down the lower half, and the mouth around one-3rd of the distance under the nose. The rest yous can freely experiment with! Merely remember to keep the features consequent: the more than deformed the style, the less realistic the facial features should be to brand it all look intentional.


Male and Female Anime Faces
Although manga way faces are pretty feminine to begin with, there are certain ways to make the face look more masculine:
- The eyebrows are placed low above the eyes.
- The eyebrows may be thicker and less curved.
- The eyes are narrower.
- The eyelashes are minimal and less prominent.
- The student is small and circular.
- The lips are even less pronounced.
- The jawline is more than pronounced.
- The neck is thicker.
- The nose is more pronounced.
Of course, not all of these methods must exist applied. Sometimes, the sexual activity difference is shown merely by the clothes and the hairstyle!


Anime Expressions
In anime, the facial expressions are equally unproblematic as the facial features. They resemble simple emoticons to a big extent, and yous can utilise them as inspiration. Less is more here—if your grapheme doesn't accept detailed lips on their neutral face, don't show the teeth and natural language in any expressions. Keep these features exaggerated, but minimal in details.


Good Task!
Now yous know how to depict anime heads and faces, and how to draw those characteristic eyes, noses, lips, and ears. If y'all want to keep learning nearly drawing in uncomplicated styles like this, y'all may like our series on cartoon drawing...
... and our serial on how to depict in Disney way:


Source: https://design.tutsplus.com/tutorials/how-to-draw-anime-heads-and-faces--cms-31884
Posted by: whittendiente.blogspot.com
0 Response to "How To Draw Face From 3/4 View"
Post a Comment